Sunday, March 15, 2009

How to Do a Bleach-Out on Previously Highlighted/Bleached Hair


Note: This procedure applies to clients that are heavily highlighted with lightener (Bleach). If a client is just highlighted with a tint the cautions in this artical are not necessary.


 When taking a client from heavy lightened highlights to a Double Process Blonde, you must be very careful not to over-lighten the already lightened hair or your client will get major breakage. The following  6 step proceeder is how I recommend handling this situation.

6 Steps to a Beautiful Double Process Blonde

1) Bleach-out the re-growth area (virgin hair) to your desired prelightened shade, as you would do a touch up situation (don’t tone yet).

2) Dry under a cool dryer.

3) Go back with foil and weave out the dark hair and bleach it separately (this can be a pain, but do the best you can).

4) When the dark hair inside the foils becomes the desired pre-lightened shade, take the client to the shampoo bowl and remove the foils rinsing all the hair with water.

5) Next, while at the shampoo sink and with the hair wet, run a mild bleach solution through the entire head just for a minute or two. This will freshen the old highlights and prepare them to better accept the toner.

6) Shampoo out the lightener and use an anti-oxidation treatment to neutralize any lightener residue that may be left in the hair before toning.

 Dry Hair Before Toning.

 At this point, the hair should be dried (use a cool dryer only) before the toner is applied. Check to see if the bleach-out is even.  If it is not, go back and spot bleach the areas that need to be lighter.


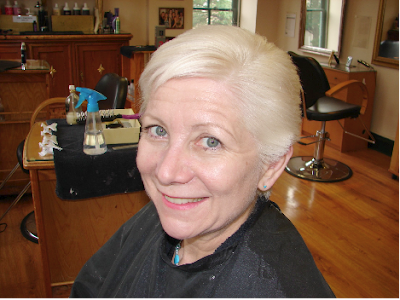
For this Double Process Blonde I used:

Bleach: Clairol Born Blonde w/3 activators  & 2o volume H2O2

Bleach-out on re-growth 40 Min.

Toner: Wella Color Touch  3/4-10/73 & 1/4-9/73 

Toner Timing: On for 1 min. only 

     IF THE BLEACH-OUT IS NOT ACCEPTABLE AT THIS

POINT, DO NOT PROCEED.

 GO BACK AND CORRECT THE BLEACH-OUT.


Haircolor Secret

IN DOUBLE PROCESS BLONDING, YOUR FINISHED PRODUCT IS ONLY AS GOOD AS YOUR BLEACH-OUT.

This lesson is an excerpt from my best selling book "Stunning Double Process Blondes" in the “Trade Secrets of a Haircolor Expert” Home Study Course. If you would like more information…

Click Here:http://www.haircolortradesecrets.com/blondes-double-proccess.htmi

Sunday, March 8, 2009

Formulation Secrets for Red Haircolor

Formulating red hair color can be the most intimidating of all colors. Anyone with a first time client sitting in his/her chair for a single process touchup who is presently wearing a beautiful shade of red and says, “I love my color…just do my re-growth and match what I have” knows what I’m talking about. If your not 100% sure about your haircolor formulation abilities, you will probably be sweating bullets at this point.

 Look at the  Exposed Contributing Color Pigment Guide below and follow with me as I point out a few things.


You first need to establish what your client’s natural level is. If you are not sure, use the natural level swatches in your color chart book to help. Remember, a level is determined by lightness to darkness minus the tone.

 Next, determine what shade of red your client would like to be

(level & tone). Do this by looking at your manufacturer’s swatch book.

 Once you have determined her natural color level, find it on the left side of the chart and then go to the right side of the chart to see what the ‘exposed contributing color pigment” will be for that level.

 By doing this, you will be able to predict what color will result as you lighten the hair.

 If his/her natural color level is 1 or 2, as you can see, about all that you are going to get is a red brown unless the hair is pre-lightened. Levels 3, 4, 5, 6 & 7 will give you good bases for many red haircolor options. I call this the “Red Region”. Levels 8, 9, 10 don’t have any red or orange; so they will be very weak reds but will be fine for very light reds such as strawberry blonde, copper blonde and apricot.

 Typically, as long as you’re working on level 6 or darker, and assuming the client has no gray hair, you will probably be able to use the color you have chosen directly on the client per the manufacturer’s instructions.

 Most manufacturers state, if you want to go 3 to 4 levels lighter than the client’s natural level, you must use 30 volume developer and 40 volume to go 5 levels lighter. Usually, if you are staying in the same level, lifting only 1 or 2 levels or going darker, 20 volume is sufficient.

 Formulating for a client that has either Gray (non-pigmented) or light blonde hair becomes a little more challenging. These clients, in many cases, don’t have enough warmth in their hair to give the depth in color tonality that needed in order to achieve a good red color. What you need to do is mix the desired red shade with a brown base color (natural base or gold base) to make up for the lack of brown in the hair.

 I’ll be referring a lot to what I call brown base colors. As a rule of thumb, if you want to create a cool red (auburn, plum, burgundy, violet base reds), I recommend using a natural or neutral base color for your brown base color.

 If you want to create a warm base color (red-golds, copper reds, strawberry blonde), I recommend using a gold base color.

 Use the gold or natural base colors in the same level as the desired shade with which you will be working.

 For example,

5rv+    5n  ==Desired Shade

 7ro     +7g  ==Desired Shade

 This lesson is an excerpt from my best selling book "Amazing Redheads" in the “Trade Secrets of a Haircolor Expert” Home Study Course. If you would like more information…Click Here: http://www.haircolortradesecrets.com/redheads.html

Sunday, March 1, 2009

Making Gray (non-pigmented) Hair Blonde

GREAT GRAY COVERAGE At first thought, it probably seems like making gray (non-pigmented) hair blonde should be a very simple and straightforward process. It would seem that you just mix any blonde color you desire; simply apply it, re-growth to ends and you're done. If you've tried this before, you may get lucky once in a while, but eventually you will have problems such as: Gray (non-pigmented) hair…. • Is not actually covered • Looks too drab • Looks pink • Looks brassy gold • Has a greenish cast • Has a bluish cast • Looks orange • etc. Formulating for gray (non-pigmented) hair has a few secret ground rules which we have to abide by in order to be successful and create beautiful colors on gray (non-pigmented) hair.
Secret Ground Rules
Secret Ground Rule #1 Never use a straight ash blonde tint on gray (non-pigmented) hair even if you want an ash blonde finished result. Gray (non-pigmented) hair is ash by nature; therefore, if you use a straight ash tint on it, you will get very drab results.
Haircolor Secret Ash Hair + Ash Tint = More Ash/Drab Color
The hair could look smoky, gunmetal green, lavender, or steel gray. Secret Ground Rule #2 To get total gray coverage on resistant gray (non-pigmented) hair, you will need to use a level 8 blonde or darker. (If the hair is a fine texture, level 9 may work). Most manufacturers will tell you that, in order to get good gray coverage on resistant gray (non-pigmented) hair, you need to use a level 8 or darker. This is because in most cases, there is not enough dye load into levels 9 or 10 to obtain adequate gray coverage on resistant gray (non-pigmented) hair. Secret Ground Rule #3 Never put a straight cool red tint on gray (non-pigmented) hair. Gray (non-pigmented) hair lacks warmth (contributing color pigment/golden & red), so it will always show the full impact of the base in a tint. Cool red colors such as RV’s (red violet) and PR’s (purple reds) will look pink in the lighter shades and lavender or mauve in the darker shades. This is because the hair itself has no gold (warmth) to compensate for the tint which would balance out the color. The Secret Ground Rule #4 Gray (non-pigmented) hair will always turn yellow when lightened because of the pheomelanin (red-yellow) pigment which is still in the hair. I already stated this at the beginning of this book. The reason I am emphasizing it is to make sure you realize that, before lightening gray (non-pigmented) hair, be prepared to tone if necessary. Sometimes you'll get lucky and not have to use a toner at all, but in most cases, the yellow bleached-up gray (non-pigmented) hair will look raw or straw-like so just be ready to tone if needed. Secret Ground Rule #5 All gray (non-pigmented) hair is not created equal and, therefore, will not react the same to tinting, bleaching or toning. Coarse textured gray (non-pigmented) hair will always react slower and be more stubborn when tinting, bleaching or toning. Finer textured gray (non-pigmented) hair will always react quicker to tinting, bleaching and toning. Keep in mind that on the same head of hair, you will have a mixture of fine, medium and coarse gray (non-pigmented) hair. And in some cases, you may have to treat these different parts of the head with separate hair color formulas. Secret Ground Rule #6 In most cases, when covering 75% to 100% gray (non-pigmented) hair, you will have to mix the desired shade with either a gold base tint or a neutral/natural base tint in order to make up for the lack of warmth in the hair. Most tints are made to be put on pigmented hair, which will give a contributing color pigment of red or gold. Therefore, if working on 100% gray (non-pigmented) hair, you will have to mix in the missing tone (gold/red), or both, in order to make up for the lack of this warmth in the gray (non-pigmented) hair. This lesson is an excerpt from my book "Great Great Coverage" in the haircolor trade secrets program. If you would like more information click here now:http://www.haircolortradesecrets.com/gray-hair.html